
Thank you for stopping by. I am excited to share with you this mannequin that I created, it was so much fun! I will going through step by step how I created this. I hope that you will be inspired to create one for yourself. Below is a step out tutorial explaining how I created this. Enjoy!

Products Used
13 " Paper Mache Mannequin
20 gauge wire for wings
Paper pattern for wings
Lace for wings
White Gimp trim for Wings
White Paint
Tulle
Lace applique for bodice- Roughly 9" long.
Lace trim for shoulder straps on bodice
Feathers- Two packages
Sheer Organza double ruffle ribbon for bustle - 1.5 yards
Flower Sprays
You will also need: a glue gun, scissors, and wire cutters.


The first step is to paint the mannequin the color of your choice, here I used white.The second step is to apply tulle to the waist band. Start by gluing one end of the tulle to the waist, then double it and glue the double part to the waist. Continue to double the tulle and glue to the waist all the way around . You can make the tulle as long as you want the "dress" to be, I chose to make it "floor length". Once you have the tulle all glued on, cut the "loops" at the bottom where they were folded over and trim up the tulle so that it is even.


Once you have the tulle trimmed to the desired length it is time to start gluing feathers to the tulle, this is going to be the "skirt". I used feathers that I had in my stash, but think that Marabou feathers would be gorgeous. I will post a link below where you can buy the Marabou feathers. I started by gluing a layer of feathers all around the bottom of the tulle. I then added a second layer about half way up the tulle with the ends of the feathers covering the top of the feathers in the layer below. I finished by adding a third "shorter" layer of feathers at the top. Once you have all the feathers glued on, you can go back and check for any areas that may need more feathers added.


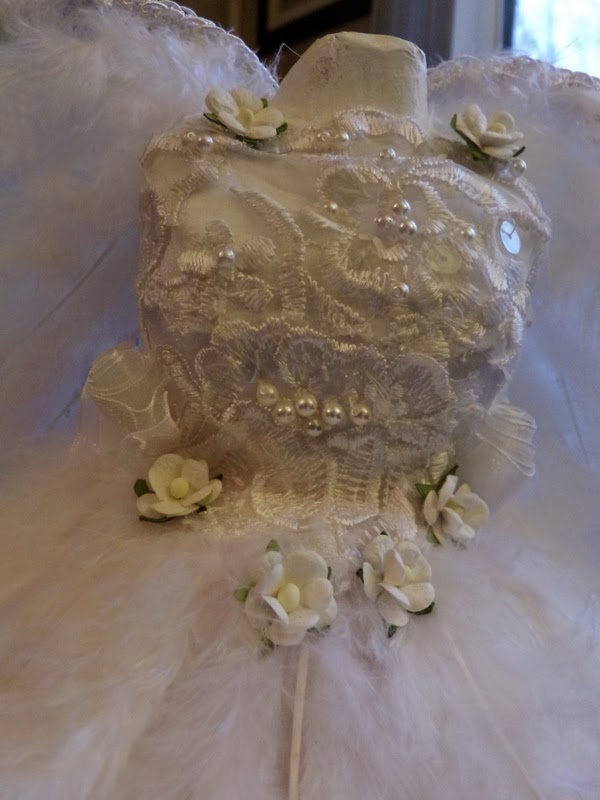
Next we need to add the bodice. I cut a piece of white satin roughly 2 - 2.5" wide and long enough to wrap around the bodice. I glued this to the bodice using a hot glue gun, and making small "pleats" under the breasts to make it more form fitting. I then took my lace applique and applied that over top of the satin. Notice in the second picture I did not take the applique all the way around the back as this is where the wings are attached. At this point I added some 1/2 inch wide lace trim to the "shoulders" of the bodice for straps.


At is point I added the sheer double ruffle ribbon to the waist line. I used the same ruffled lace to create a "rolled" rose bud to the side of the bodice on each side. To create the rose bud, fold the ribbon in half and roll the ends in adding hot glue as you roll. When you get the desired size simply cut the ribbon and glue the ends to the back of the rose. It is now ready to attach to your "dress". I next took the remaining double ruffle ribbon and created a "bustle" on the back of the skirt. I did this by gluing one end of the ribbon in the center back of the bodice at the waist line. I started twisting the ribbon and gluing to create the bustle. The ribbon can be adjusted to be looser or tighter as desired in the bustle. I started out twisting the ribbon fairly loosely and then went back in and made glued some areas to give it a more "bustled" effect.


Now it is time to make the wings. I learned this technique from a video by Angela Holt. The link to her video will be below. I started by drawing a "wing" on paper. You can also find many free wing templates on the Internet if you would rather not draw them, however, I would be sure to use a rather simple wing shape, as we are going to be using wire to make the actual wings, and a pattern with lots of curves would be more difficult and time consuming. Once you have your wing shape, you are going to take your 20 gauge wire and start to shape the wire around the wing shape. I used tape to hold the wire as I continued to shape it. When you get to the end of the shape use your wire cutters to cut the wire, leaving a small "tail" to twist the wire together which forms the wing. Angela's video goes into much greater detail on how to do this step. Now that you have the wing shape, you are going to get a piece of lace big enough for both wings to fit on. You can also use lace appliques or fabric for this step as well. Set your "wire wings" on top of the fabric, making sure that your wings are facing in opposite directions or you will end up with two wings facing the same way. Now begin gluing the wire to the fabric. Press down on the wire as you glue to make sure that you are getting good contact with the fabric. When done gluing allow the glue to dry thoroughly and then cut out the wings. Trim as close to the wire as possible but be careful not to cut the glue away. If this does happen simply add more glue to the edge. I used 1/2" white gimp to the edges of my wings but you can use anything to you would like to "finish off " the edges.


At this point I glued the wings to the back of the bodice. Once the wings were glued to the bodice I added a few feathers to the front side only of the wings, leaving the back just lace. You can add as few or as many or even no feathers depending on the look you want. If you choose to add feathers, you will have to do some trimming of the feathers to get them to fit to the curve of the wing.
The next and final step is to add flowers. In the front I added to small flowers at the top of the bodice where the straps meet the bodice and around the bottom point of the applique. On the back I glued three medium sized flowers to the area where the wings meet and added smaller flowers and sprays around the medium flowers, I also added a couple of sprays to the bottom of the bustle.
That's it we are done! I hope you have enjoyed this tutorial. If you have any question, or comments please contact me, I am happy to help.
Angela Holt Wing Video can be found at: https://www.youtube.com/watch?v=Uj0eJqAO6Ac&list=UUB7Gc-z1Pdf2ajelfK6bDoQ
The Marabou Feathers can be purchased at Creating With Details: https://www.creatingwithdetails.com/
This is absolutely beautiful! I wish I could pin this. But the step-by-step instructions and pictures should make it easy to follow. You are truly blessed with with magnificent creativity and talent ♡ Carrie Best
ReplyDeleteThis is absolutely stunning Robbin and I am in awe of your talent!
ReplyDeleteAbsolutely gorgeous! I am most certainly going to have to make one for my studio!!! Thanks for all the hard work making up the tutorial!
ReplyDeleteHugs,
Beth P
Stephanie B's Creative Design here. ILOVE your
ReplyDeletetutorial on the feather angel mannequin!! Your
tutorial came together very well!!
Thank you all so very much for your wonderful comments! I would love to see pictures of the ones you create . Blessings to all <3
ReplyDeleteThis comment has been removed by the author.
ReplyDelete