Thursday, December 18, 2014

Altered book box for creatingwithdetails.com

Hey Crafty Ladies

Im so glad you stopped by! This vintage book box reminds of a bigone era, one where beauty and gentleness were common place. The face of the little angel is so gentle and peaceful looking, that I could not resist making her the focus of this vintage box.

The base of this vintage book box is a paper mache box  that was covered in gesso . I then used a 6x6 doily stencil and spakling compound to add texture to the surface. After the surface was dry, I painted the entire book with a creamy pale yellow acrylic paint and then inked the raised surface of the doily and all edges of the box to create an aged look. Next I applied the photo of the little angel girl using mod podge. I then applied Venise Ivory Daisy Trim to both sides of the photo. On the top and bottom of the photo I used a chipboard filigre from my stash painted in the pale yellow acrylic paint and glued an Ivory 20mm pearl to the center of each filigre. On the binding of the book I glued a piece of Chiffon Ruffled Beaded trim. On the sides of the book box I glued a piece of Embroidered Lace trim-ivory

I glued the latch which I covered with gesso onto the side of the book box. The top half of the latch was glued to the underside of the top cover and the base of the latch was glued to side of the book box. Now you can hide all your secret treasures inside. 


On the inside of the top of the lid I cut apart medalions from a piece of Venise Lace Trim Scalloped Trim. On top of the medalion I glued a Ivory Resin Cabachon frame. To the center of the frame I glued a Coffee Resin Cameo. In each corner of the top of the box in the center of the lace trim I glued a 10mm Ivory pearl.

Products Used

From my stash
6x6 Doily stencil
Spakling compound
Chipboard filigree
Adhesives

I want to thank you again for stopping by and hope that you like this gentle little vintage book box. Make sure you stop by http://www.creatingwithdetailsstore.com/ for all of the items used in this project. May the Lord make His face to shine upon you!



Shabby Chic Christmas Ornament DT project for creatingwithdetails.com

Hey Crafty Ladies!

I am so excited to share my first DT project for Creating with Details with you, a Shabby Chic Christmas tree ornament!  So without further Ado here is the finished product!

Materials Used

Charm Pendants Key Antique Bronze Flower & Heart Pattern 3.4x1.1cm, CWK02374 Pack of 1


Oval Antique Bronze Keyhole Pattern Carved 3.7x2.5cm, CWK10483 Pack of 1


White 11mm Acrylic Pearl Imitation Embellishments Findings for Craft/ Wedding/ Phone Flower 11mm Dia Pack of 20


3CM chiffon lace rose - 1 yd

Other items used from my stash:
Round Glass Christmas Ornament
Small white flowers
Small white flower trim
Small white string pearls
Fringe
Glue Gun
Scissors


The first step was to cut apart the Venise lace trim to get these pieces. I then glued the two medallions on opposite sides of the glass ball.  And added the key hole to one medallion and a key charm to the opposite medallion.

On the two remaining sides I glued an 11mm white acrylic pearl and then glued the lace pieces cut from the top and bottom of the medallion on the top and bottom of the pearl. I glued a small white flower to either side of the pearl to complete the sides.

For the top I used the white chiffon lace roses and glued them around the metal hanger. I added a small white trim around the bottom and added a couple of small white flowers. I also added a small piece of white string pearl for hanging. 


For the bottom of the ornament, I took a small piece of fringe trim and some strings of pearls and glued them together, then glued this to the bottom of the ornament. I added another piece of the white chiffon lace roses around this piece. Lastly I glued another piece of small white trim on top of the white chiffon lace roses to finish it off.

I hope that you enjoyed this, as I had a great deal of fun creating it.


Robbin McCrumb
DT for Creating with Details


Shabby Chic Church DT project for creatingwithdetails.com


http://www.creatingwithdetailsstore.com/


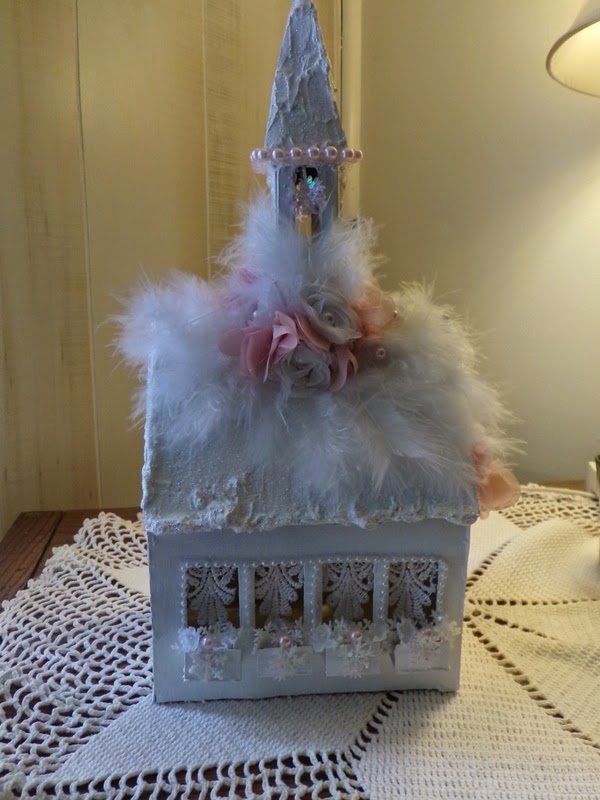
Hey Crafty Ladies!  This is a DT project for Creating with Details. This was such a fun project to do! I hope you like it as much as I do! I present: Shabby Chic Church.


Materials Used

Venise White Lace Trim - 1yd


Other Materials Used from My Stash
Chipboard 
Texture paste
White Acrylic Paint
Small pearl string
Medium pink string pearls
Small Mushroom bird
White feathers
White glitter
Small white flowers
White leaves
White flower stamens
Small glittery snowflakes
Glue gun
Scissors

The next few photos show the basic creation of the church itself. I drew out the shapes of the church on medium weight chipboard, glued them together with a hot glue gun, and then covered all pieces with gesso. After the gesso dried I cover the roof of the church and steeple with texture paste to create the feeling of snow on the roofs. The smaller pieces in the foreground are for window boxes for each of the eight windows.  After the texture paste dried, I painted the entire surface with white acrylic paint, and while wet sprinkled the roofs with white glitter then glued the window boxes to the bottom of the windows. 


I cut the white Venise lace to use as curtains in the windows, then glued them inside each window with a hot glue gun.

In the following picture you see the Venise lace glued inside the windows, small pearl string glued around the windows and small glittery snowflakes and one medium pink pearl glued into each window box.


I glued the steeple on top of the church, and began to add the 1" chiffon lace trim, and the 3cm chiffon lace roses around the base of the steeple.I added some small white leaves and small white flowers around the base and white stamens under the bird to give the impression of a nest. I also glued the small glittery snowflakes to the steeple windows. 

I glued medium pink string pearls around the base of the steeple roof. I then added white feathers around the bird and on the roof of the church.


On the front of the church I glued small white string pearls around the door. A small piece of medium pink string pearls at the bottom of the door, as steps or threshold. I used an 11mm pearl for the door knob. At the roof peak I added the pearl broach. Under the broach I added a few small white flowers and some more of the 1" chiffon lace trim. I glued a piece of the pink bead spray to the door to mimic a wreath. 

This was such a fun shabby project and the options and possibilities are endless! If you have any questions please let me know and I will do my best to answer them. If you create one I would really love to see pictures.

Thank you for stopping by and have a blessed day.


Robbin McCrumb
DT for Creating with Details


Altered Canvas DT project for creatingwithdetails.com

http://www.creatingwithdetailsstore.com/

Hey Crafty Ladies!!!

This time of year is always difficult for those of us who have loved ones who are not longer with us in body. We miss them everyday, but the holidays are always the most difficult as there are so many memories of times long ago. This year I decided to celebrate their lives and their new heavenly bodies by creating this canvas that I call Angel Ascending. I have felt the presence of many angels around me, giving me peace and comfort. The inspiration for this canvas is my vision of what I think that it would feel like to ascend to heaven and all of the beauty that would surround one as they make this wonderful journey to their new forever home. Angels are God's way of letting us know that we are not alone, that we are loved and protected. May you all feel the presence of your angels through out the holiday season and beyond. God bless and keep you!

The canvas background was created using scrapbook paper from my stash. Then I applied a script stencil using spakling compound and let this dry. I added a few pieces of cheese cloth using Mod Podge. I also used a honey comb and burlap stencil using spakling compound as well.

I placed a piece of Embroidered Lace Trim in Ivory in the center of the canvas.

For the Angel I created a paper mache dress form and cut the back half off of it. I then painted the form with Gesso and covered it with lace from my personal stash. I glued strips of lace and ribbon under the bodice and the put a piece of All Over Cotton Vintage Trim on the bottom half of the dress form. I added a piece of bling from my stash to the top of the bodice. I cut 2 small pieces of Chiffon Ruffled Beaded Ribbon Trim and added them to the top of each side of the bodice to give the impression of sleeves.


The Angels wings are pieces of Maribou Feather Trim in white.

In the top right corner of the canvas over the cheese cloth I put a Clear Wheat Acrylic Spray and Mini Chiffon flower with Wh Pearl and Rhinestones over top of CA Metal Cameo that was painted with gesso. I also added some clear and amber beads from my stash to the bottom of the cameo.

In the top left corner of the canvas I applied some white leaves , and white flowers from my stash, along with some rhinestones and a small crown also from my stash. At the bottom of the flowers I attached a ribbon bow with an Ivory 10mm Acrylic Pearl in the center.

I painted a Copper Tone Filigree Flower Wrap with gesso and added a 20mm Ivory Acrylic Pearl to the center.
 On the right side of the angel I used a chipboard harp from my stash, that was covered in gesso and white pearls. I attached ribbon and a small piece of lace to the top of the left side of the harp.
In the very bottom right corner I added a 20mm Ivory Acrylic Pearl surrounded by rhinestones and strokes of gesso.

Products Used
20 mm Ivory Acrylic Pearl
Copper Tone Filigree Flower Wrap
Clear Wheat Acrylic Spray
Ivory 10mm Acrylic Pearl
Mini Chiffon Flower with Wh Pearl and Rhinestones
CA Metal Cameo
Maribou Feather Trim-White
All Over Cotton Vintage Trim
Chiffon Ruffled Beaded Ribbon Trim
Embroidered Lace Trim in Ivory

Items from my personal stash

Stencils
Spakling compound
Ribbon
White paper flowers
Rhinestones
Metal crown charm
Bling button
White string pealrs

I want to thank you for stopping by and spending time with me and my angel. I hope you enjoy this canvas and that you are blessed.